Eliminating Feedback: An Audio Professional's Guide to 'Ringing Out' a Performance Space

No audio system is perfect. This statement is not only something all audio professionals and amateur sound guys/gals should remember, but also the main reason we exist as audio professionals! Without issues such as feedback, phase cancellation, comb-filtering and standing waves there would be no need for a skilled person to minimize or eliminate them.
Of the issues that plague audio systems the most noticeable and therefore most feared is feedback. Everybody has, at some point in their lives, had their ears assaulted by that piercing shriek. A millisecond later every head whips around to glare at the frantic sound guy trying to fix the problem. It doesn't have to be this way.
This article will give you a step by step guide to setting equalizer parameters to squeeze every decibel out of any audio system before feedback occurs.
A Word on Equipment
The single most important piece of audio equipment for eliminating feedback is a graphic equalizer and so this article assumes you have a graphic equalizer in your audio set up. Other than that, it doesn't matter what equipment you are using; the principals remain the same. I follow the same steps ringing out a portable two-speaker PA with one microphone input as I follow when ringing out a 1400 seat theatre with multiple wireless microphones and a full band.
Fixing Feedback
In essence, fixing feedback is as simple as identifying and cutting problem frequencies. These problem frequencies occur as a result of imperfections within the design and manufacture of sound systems.
The first step is to push your audio system to the point where it feeds back. You can do this by placing one microphone in the room and increasing the gain slowly until it starts to ring. The frequency at which it rings is the first frequency you need to cut.
Once you have cut the first feedback frequency, begin to slowly increase the gain again until you get more feedback. If the feedback is at the same frequency as before, you didn't cut enough! If it is at a different frequency, identify this frequency and cut it.
You should continue this process for a while, increasing the gain, identifying and cutting each problem frequency.
Frequency Recognition
In order to EQ a room effectively, you need to be able to identify the problem frequencies. When the microphone starts to feedback you need to know the pitch of the feedback so you can quickly make the appropriate cut.
Learning to recognize frequencies is a skill that requires lots of time and practise to master. It is something that doesn't come naturally and takes effort and commitment to achieve. This is one area of sound technology that really separates the men from the boys.
You can start by using an RTA (Real Time Analyser) that will give you a visual representation of the dB SPL of each band. The band closest to the feedback frequency will appear as a spike on the graph. You can download RTA apps for most mobile devices these days which is a really useful tool to have at your disposal.
A Typical RTA Display
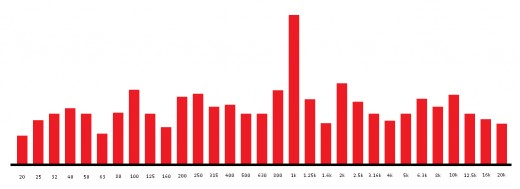
The picture above depicts the display of an RTA that is detecting feedback at 1kHz. As you can see, the SPL of 1k (1000Hz) is significantly higher than the other frequencies. For this example, we would start to reduce the level of 1kHz on the graphich EQ until the ringing stops.
With time and practice you will begin to recognize the frequencies yourself. At first you can try to 'ball park' it by listening to the feedback and trying to decide two points it falls between. For example, 1kHz and 3.16kHz. You could then start to reduce one of the faders between these two points to see if it has any effect.
Eventually, you won't have to ball park or use an RTA. When you hear the ring, you will know the frequency you need to cut. Reaching this point will make your life as an audio professional so much easier; no more trial and error when feedback strikes mid-show, just reach over and dip the problem frequency a little. The feedback will be gone so fast, many of the audience members won't even notice it!
Striking A Balance
Be aware that with every cut you make you are affecting the character of the sound. It is here that ringing out a room turns from a science into an art.
There is always a danger of making too many dramatic cuts. This is a common trap that many people fall in to. In their haste to secure bags of gain they forget that their job is to make the room sound as good as it can. Cutting too many frequencies will affect the overall sound of the room, making the sound coloured and unnatural. It is important to avoid feedback, but it is also important to make the room sound real and unaltered.
As with so many aspects of audio reinforcement, this is down to practise, experience, trial and error and personal taste. You have to decide how far to go with EQ before the sound suffers. Ringing out a room is a skill that takes many hours of practise to perfect. There will always be a trade off between the overall quality of the sound and how loud you can go before you have issues. As an audio professional, it is your job to decide where the line is drawn.


